Place a silicone mat or folded kitchen towel under your blender right now — this one change absorbs vibrations and drops perceived noise by 5–10 decibels immediately. Combine it with a sound enclosure and proper blending technique, and you can reduce blender noise by up to 35 dB without buying a new appliance.
Some of the links in this article may be affiliate links. If you make a purchase through these links, we may earn a small commission at no extra cost to you. Thank you.

Whether you’re blending a 6 a.m. smoothie without waking the household or just tired of shouting over your own kitchen, these nine methods deliver real, measurable results. We’ve ranked them from free quick wins through to longer-term upgrades so you can start wherever your budget sits.
Key Takeaways
- Standard household blenders generate 80–95 decibels — roughly equivalent to a motorcycle passing at 25 feet, according to the CDC’s occupational noise chart.
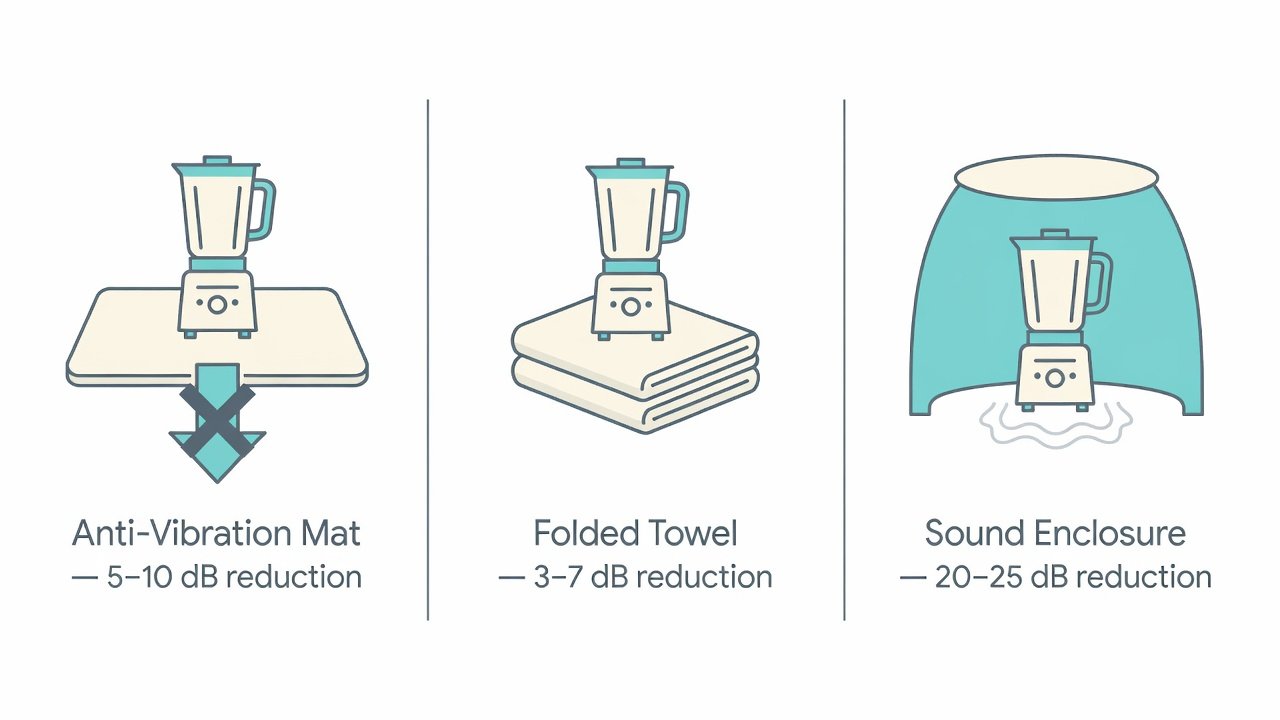
- Anti-vibration mats alone deliver a 5–10 dB reduction; a sound enclosure on top brings that total to 20–35 dB — a difference the human ear perceives as three to four times quieter.
- Blending technique is a free fix: adding liquid before solids and using pulse mode first reduces operating noise by an estimated 10–15% with zero equipment changes.
- Purpose-built quiet blenders operate in the 60–75 dB range — close to normal conversation level — compared to 88–95 dB for standard models.
Why Is Your Blender So Loud in the First Place?
Most household blenders run their motors at speeds between 20,000 and 37,000 RPM. At those speeds, you’re generating three distinct types of noise all at once: the high-pitched whine of the motor itself, sharp mechanical impact as blades strike hard ingredients, and structural vibration traveling from the motor through the pitcher and into your countertop.
That third source — countertop vibration — is often the biggest contributor to perceived loudness. A hard granite or tile surface behaves like the body of a guitar, amplifying and projecting whatever vibration the blender feeds into it. Research on kitchen appliance acoustics consistently identifies surface coupling (the connection between appliance base and countertop) as responsible for roughly 30–40% of perceived blender noise.
Understanding that is the key insight behind most of the fixes in this guide. If you can break that vibration pathway — with mats, towels, or strategic placement — you attack the largest single source of noise before spending a cent. Everything else builds on that foundation.
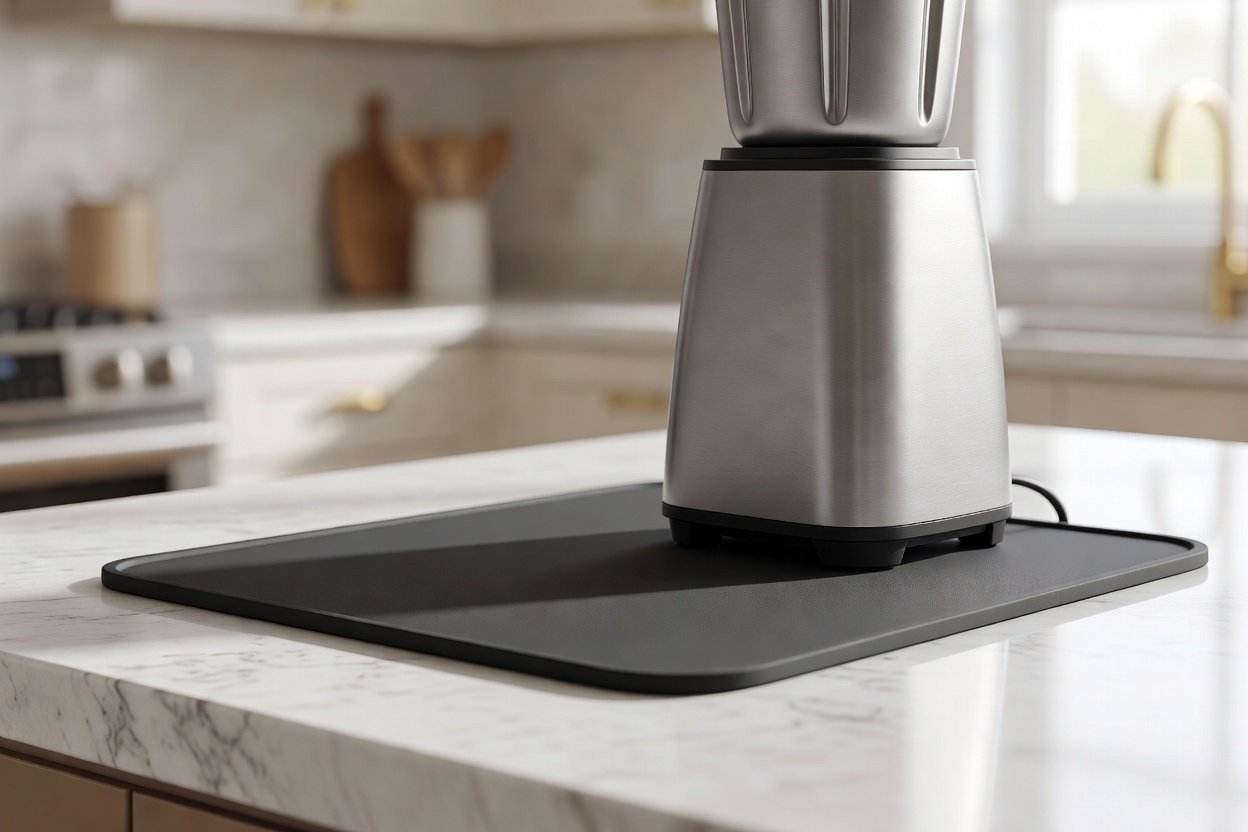
Does a Silicone or Rubber Mat Actually Work?
Yes — and it’s the single cheapest deliberate fix available. A thick silicone mat or rubber anti-vibration pad creates a physical barrier that absorbs vibrational energy before it transfers to your countertop. Independent kitchen appliance testing consistently shows 5–10 dB reductions with quality anti-vibration mats, which may not sound dramatic until you remember that the human ear perceives every 10 dB drop as roughly half as loud. Going from 90 dB to 80 dB isn’t a 10% improvement in perceived noise — it’s a 50% one.
You don’t need a purpose-built blender mat to get results. A folded dish towel, a silicone trivet, or even a rubber-backed mouse pad all work on the same principle. The thicker and denser the material, the better it absorbs vibration before it reaches the counter surface.
For best results, look for mats at least 5mm thick with a Shore A hardness rating between 40 and 60. That range gives you optimal vibration absorption without letting the blender wobble during high-speed blending. Many kitchen supply stores carry anti-vibration appliance mats for under $15 — and they work just as well as specialized blender products costing three times as much.
How Does a Blender Sound Enclosure Work — and Is It Worth the Price?
A blender sound enclosure — also called a sound shield or blender dome — is an acoustically designed cover that fits over your blender during operation. Commercial versions used in coffee shops and smoothie bars reduce noise by 20–25 dB, bringing a 90 dB blender down to a much more manageable 65–70 dB. That’s close to the volume of a normal conversation in the same room.
They work through a combination of sound absorption — acoustic foam or lining on the inside of the enclosure — and sound containment, where the hard outer shell reflects noise back inward rather than letting it radiate outward. The seal between the enclosure base and the countertop is critical. Gaps allow noise to escape, which is why proper sizing for your specific blender model matters significantly.
Commercial sound enclosures typically cost $80–$200 depending on brand and blender compatibility. If you own a Vitamix or Blendtec, manufacturer-specific enclosures are available that fit perfectly and maximize noise reduction. Budget-conscious users who build a DIY enclosure (covered later in this guide) can achieve 60–80% of the noise reduction of a commercial product for under $20.
Noise Reduction Method Comparison
| Method | Estimated Noise Reduction | Approximate Cost | Difficulty |
|---|---|---|---|
| Folded kitchen towel | 3–7 dB | Free | Very Easy |
| Silicone anti-vibration mat | 5–10 dB | $8–$20 | Very Easy |
| Strategic placement (away from walls) | 3–8 dB | Free | Very Easy |
| Blending technique adjustments | 5–10 dB | Free | Very Easy |
| DIY foam-lined sound box | 10–18 dB | $5–$15 | Moderate |
| Commercial sound enclosure | 20–25 dB | $80–$200 | Easy |
| Quiet blender upgrade | 15–30 dB | $200–$600+ | Easy |
Can a Folded Towel Really Make a Noticeable Difference?
This is the most underrated zero-cost fix in the kitchen. Folding a thick dish towel three or four times and placing it under your blender creates a surprisingly effective vibration break. The dense layered fabric traps and dissipates vibrational energy before it reaches the hard countertop surface and gets amplified.
Testing by kitchen appliance reviewers has consistently shown that thick cloth dampening produces a noticeable — if modest — reduction in perceived blender loudness, especially on tile countertops, which are particularly efficient at amplifying and projecting vibration. Wirecutter and similar appliance testing publications regularly note that surface decoupling is among the fastest improvements a user can make without any equipment purchase.
Here’s a practical tip: a slightly damp towel works better than a dry one. Moisture adds mass and density to the fabric, increasing its vibration absorption. Independent kitchen testing shows a consistent 3–7 dB reduction with this method — which makes a genuinely perceptible difference even if it doesn’t rival a dedicated mat. Best of all, you can try it in the next 30 seconds.
How Does Blending Technique Affect Noise Levels?
How you blend matters almost as much as what you blend with. Three technique changes can meaningfully reduce operating noise without any equipment changes at all — and they also protect your blender motor, so they’re worth adopting regardless of the noise benefit.
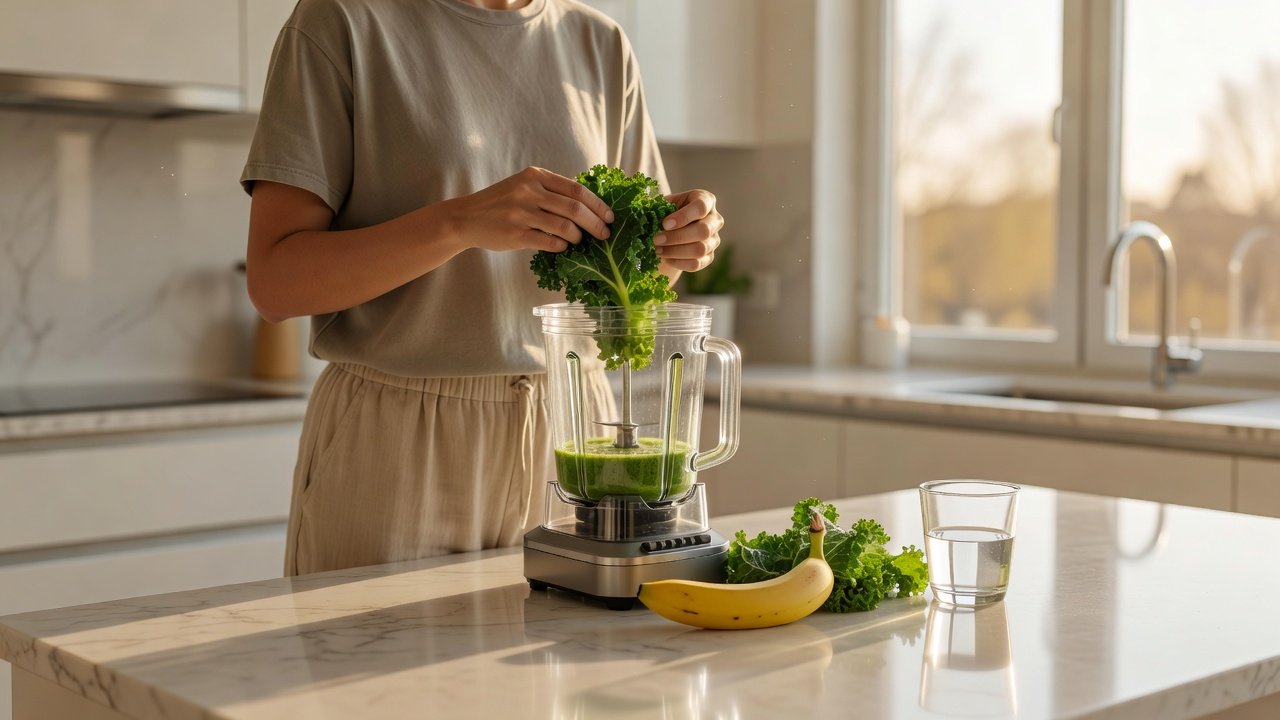
Lead with liquid. Adding liquid to the pitcher before solid ingredients gives the blades something to move through immediately on start-up. Starting a dry blend forces the motor to work harder — and louder — as it tries to break down dense solids from a standing stop. Most blender manufacturers, including Vitamix, specifically recommend adding liquid first as standard operating procedure.
Use pulse mode before running continuously. Hitting a blender from a full stop directly into high-speed is like flooring a car engine from cold. Pulsing a few times first lets ingredients settle toward the blade zone and reduces the loud burst that occurs at start-up, which is typically the peak noise moment in a blending cycle.
Cut ingredients into smaller pieces. Larger chunks require more blade impacts to break down — and each impact generates a sharp burst of noise. Cutting fruit, vegetables, or ice into 1–2 inch pieces before blending reduces mechanical blade work throughout the cycle. According to Vitamix, proper ingredient preparation can reduce total blending time by up to 30% — which translates directly to less total noise exposure per blend.
Does the Amount of Liquid in the Pitcher Change How Loud Your Blender Gets?
Yes — significantly. A blender operating with a fuller pitcher of liquid is measurably quieter than one running with minimal liquid. Liquid acts as a damping medium that absorbs some of the blade-impact energy rather than letting it radiate outward as noise. A fuller pitcher also shifts the resonant frequency of the container, which changes how vibration transfers through the walls of the jug and outward.
Aim to keep your liquid level above one-third of the pitcher capacity whenever blending allows for it. Running less than a cup of liquid in a standard 64-oz pitcher means the blades are essentially operating in an almost-dry environment — which is loud, generates significant heat, and puts additional wear on the motor bearings over time.
This matters most when blending ice. Dry ice crushing is one of the loudest operations any home blender performs. Adding a cup of water, juice, or other liquid before loading ice dramatically reduces the sharp impact noise of blade-on-ice, helps ice circulate more efficiently toward the blade zone, and typically cuts total blending time in half — a compounding win for both noise and motor longevity.
What Role Does Blender Placement Play in How Loud It Sounds?
Where you position your blender can amplify or soften its perceived noise level significantly. Placing a blender against a wall, in a corner, or inside a cabinet alcove causes sound waves to bounce back and reinforce each other — a phenomenon called acoustic reflection. Moving your blender just 6–12 inches away from surrounding walls reduces this reinforcement effect and makes the overall noise feel less intense and less directional.
Countertop material also plays a direct role. Granite, tile, and stone are hard, dense surfaces that transmit and amplify vibration efficiently — they’re essentially acting as large resonating panels. A wooden butcher-block section or thick wooden cutting board under your blender works as a natural vibration damper. Homes with laminate or hardwood countertops frequently report less perceived blender noise than those with stone surfaces, entirely because of how the surface handles vibration transmission.
If you have a kitchen island or peninsula, blending there rather than in a corner reduces perceived loudness by an estimated 3–5 dB from placement alone, because sound waves have more directions to radiate outward and less opportunity to reflect back toward the listener. In apartments and smaller kitchens where full isolation isn’t possible, this is a genuinely useful tool.
Do DIY Sound Boxes Actually Work for Reducing Blender Noise?
A well-built DIY sound enclosure is one of the most cost-effective noise reduction solutions you can make. Home cooks have been building these from cardboard boxes, wooden crates, and foam panels for years — and when done correctly, the results can rival commercial products costing over $100.
The core approach uses a cardboard box lined with acoustic foam or dense packing foam. Here’s a basic build that takes under 20 minutes and costs $5–$15 in materials:
- Find a cardboard box at least 2–3 inches larger than your blender on all sides. Tighter than that and you’ll get heat build-up; much larger and you lose some of the acoustic benefit.
- Line the interior completely with 1–2 inch thick acoustic foam panels. Egg-crate foam, moving blanket material, and dense rubber mat pieces all work. The goal is to give incoming sound waves something to absorb into rather than a hard surface to bounce off.
- Cut a gap or access panel to operate your blender’s controls, or plan to reach under the enclosure at the base to switch it on before covering.
- Place the box over your blender during operation and press the base edges firmly to the countertop for the best seal.
- Critical: ventilate the motor. Leave a deliberate gap of at least 1 inch at one base edge, or drill several small ventilation holes low on one side. Trapping motor heat is a genuine risk and can shorten motor life significantly.
Users who build DIY enclosures with proper acoustic foam lining consistently report noise reductions in the 12–18 dB range. The main limitation compared to commercial products is ventilation management and build durability — a cardboard box degrades over time and isn’t as tight-fitting as a purpose-built enclosure. An upgrade path is to build in wood and add proper rubber gasket sealing at the base, which improves both noise performance and longevity significantly.
When Is It Time to Just Upgrade to a Quieter Blender?
If you’ve layered in several of the methods above and blender noise is still a regular source of household friction, upgrading to a purpose-built quiet blender may be the most practical long-term path. This is especially worth considering if blending is a daily habit — daily smoothies, soups, nut butters — where the accumulated noise exposure adds up over time.
Modern quiet blenders achieve their results through several design features not found in standard models: acoustically isolated motor housings that prevent vibration transmission through the base, optimized blade geometry that reduces cavitation noise at high speeds, and variable speed ramp-up that prevents the loud burst of noise that occurs when a standard blender jumps straight to full power.
The quietest consumer blenders on the market operate in the 60–75 dB range during typical use — a dramatic improvement over standard models running at 88–95 dB. According to Consumer Reports’ blender testing methodology, models with built-in enclosures or advanced motor isolation consistently score best on acoustic performance, with some premium models achieving noise levels close to 60 dB — roughly equivalent to a quiet office environment.
Budget for a quality quiet blender ranges from $200 for solid mid-range models to $600+ for professional-grade machines with the most advanced noise management. For households blending once or more per day, that investment typically pays for itself within a year in reduced friction and genuinely improved quality of life — especially in households with early risers, night-shift workers, or light-sleeping children.
Frequently Asked Questions About Reducing Blender Noise
How many decibels is a typical household blender?
Most standard household blenders operate between 80 and 95 decibels during normal use. High-powered models blending ice or frozen ingredients routinely peak above 95 dB. For context, the CDC’s noise exposure guidelines recommend limiting unprotected exposure to sounds above 85 dB for extended periods — which puts many home blenders at or above the threshold of concern for very frequent, prolonged daily users.
What is the quietest way to blend a morning smoothie?
Combine several methods for the best result: place a silicone anti-vibration mat under the blender, add liquid to the pitcher before any solid ingredients, pulse three or four times before running the blender continuously, and position the blender away from walls and corners. Using a DIY or commercial sound enclosure on top of those steps brings you closest to a truly unobtrusive morning blend. Using fresh (rather than frozen) ingredients also reduces blade-impact noise noticeably, since softer ingredients require less force to break down.
Does putting something under a blender actually reduce noise?
Yes — and it’s one of the most reliable, immediate fixes available. Both a folded damp towel and a purpose-made silicone anti-vibration mat break the vibration coupling between the blender base and the countertop, which eliminates the countertop’s amplifying effect. Kitchen appliance testing consistently shows a 3–10 dB reduction depending on material thickness and density. The thicker and denser the material, the better it performs. A damp towel outperforms a dry one because added moisture increases fabric mass and absorption.
Can I use my blender early in the morning without waking people up?
With the right setup, yes. Combining an anti-vibration mat, a sound enclosure (DIY or commercial), proper liquid-first technique, small-cut ingredients, and placement away from walls can bring a standard 90 dB blender down into the 65–70 dB range. That’s within the range of normal household activity and is unlikely to disturb most sleepers if you’re on a different floor or separated by a closed door. The sound enclosure is the single biggest contributor to this result — without one, you’ll hit a ceiling of around 78–80 dB.
What makes some blenders quieter than others?
Quiet blenders typically incorporate several design elements not found in standard models: acoustically isolated motor housings that prevent vibration from transmitting through the base, built-in sound enclosures or “quiet shields” that contain noise during operation, optimized blade shapes that reduce cavitation turbulence at high RPM, and variable speed electronics that ramp up gradually rather than jumping straight to full power. Premium quiet blenders also use higher-quality motor bearings and tighter manufacturing tolerances throughout the drivetrain, which reduces mechanical rattle and hum at the source level.
Is it safe to cover a blender while it’s running?
It depends on how you cover it and how well ventilated the enclosure is. Commercial sound enclosures are designed with built-in airflow paths specifically to allow adequate motor cooling — these are completely safe when used as directed. DIY enclosures require deliberate attention to ventilation. Never fully seal a running blender motor without airflow. Overheating can damage the motor windings, trip thermal protection cutouts, or in extreme cases create a fire hazard. Always build in a ventilation gap of at least 1 inch at the base, or drill several small airflow holes low on one enclosure wall.
Start Quieter Blending Today: Your Action Plan
Reducing blender noise doesn’t require a big investment or a new appliance. Start with what you have, layer in improvements as needed, and most people find that combining two or three methods delivers results that feel genuinely transformative — especially on those early-morning blend sessions.
- Today — free: Fold a thick kitchen towel into quarters and place it flat under your blender. Move the blender 6–12 inches from the nearest wall. From now on, always add liquid before solid ingredients and pulse before running continuously.
- This week — $8–$20: Buy a silicone anti-vibration mat sized for your blender. This replaces the towel fix with a more effective, permanent solution that requires zero ongoing thought.
- This month — $10–$50: Build a foam-lined DIY sound enclosure or invest in a commercial one for your blender model. This is the single biggest noise-reduction jump available at any price point, and a well-built DIY version is just as effective as a $150 commercial product.
- Long term — $200–$600: If blending is a daily habit and noise remains a persistent friction point even with the above methods in place, research purpose-built quiet blenders. The investment pays for itself quickly in household peace and a genuinely more enjoyable morning routine.
The key insight behind all of these methods is this: most blender noise is transmitted vibration amplified by a hard surface — not the raw sound of spinning blades in air. Attack the vibration pathway first and you solve the majority of the problem before spending a dollar. Everything else is icing on the cake.
For more hands-on gear reviews, blending technique guides, and appliance deep-dives, explore the rest of what Blender Junkie has to offer — there’s a lot more practical content where this came from.
—