Cleaning an immersion blender should be quick, simple, and reliable—ideally under 60 seconds. When you follow a few proven steps, cleanup becomes the least stressful part of your cooking routine. Many home cooks waste time because they overthink it or miss a crucial post-blend habit. In this guide, you’ll learn the smart, efficient approach that saves you minutes and keeps your gear in top condition. We’ll address the common pitfall that trips people up after blending and show you exactly how to handle cleanup cleanly, safely, and without hassle.
Rinse Your Immersion Blender Blades Immediately After Use
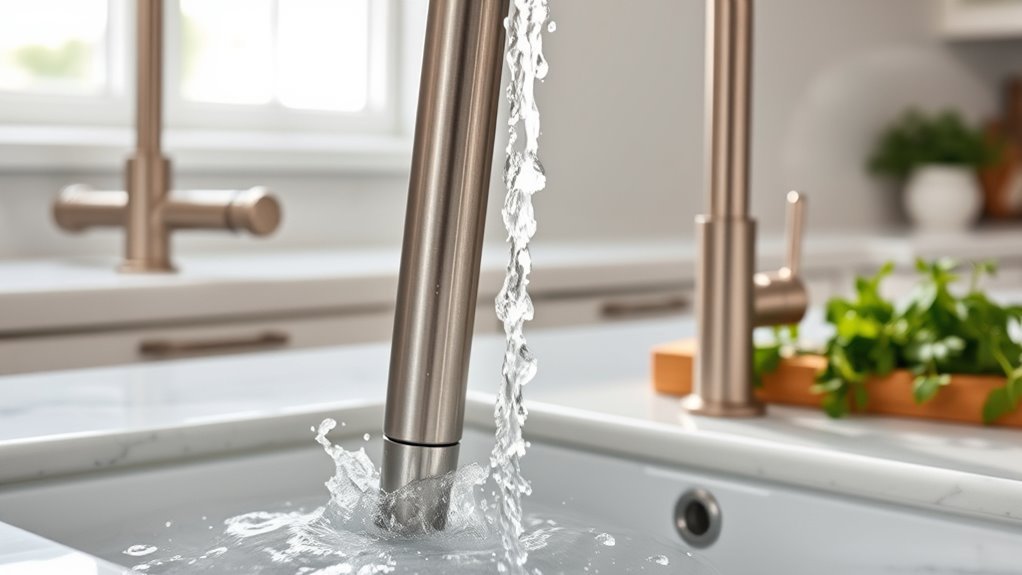
The first thing we’ll want to do after using our immersion blender is rinse it — and we mean immediately. The longer we wait, the more food dries onto the blades, and honestly, dried-on residue is a nightmare to remove. Think of it like a dirty pan — easier to clean wet than crusted over.

For blade safety, don’t touch the blades directly during a quick rinse. Instead, hold the shaft under warm running water and let the flow do the work. We’ll also want to keep water away from the motor compartment — splashing up there could cause real damage.
Before moving on to soap washing, make sure all visible residue is cleared. A thorough quick rinse now saves serious scrubbing later. Regular rinsing helps prevent buildup that can affect performance and longevity, aligning with recommended maintenance practices for high- performance blenders. maintenance practices
Unplug and Detach the Shaft Before Cleaning
Before we do anything else, we need to unplug the blender — full stop. Unplug safety isn’t something we should rush past or assume we’ve already handled. It’s the kind of step that feels obvious until, well, it isn’t.
Once it’s unplugged, we detach shaft from the motor base. Most shafts twist off pretty easily — think of it like unscrewing a jar lid, just a quick turn and it comes free. Keep all the detached parts together in one spot. I’d say toss them near the sink, somewhere ready to wash.
Don’t start rinsing anything until both steps are done: unplugged and fully separated. Doing them out of order is, honestly, how accidents happen. Let’s just not go there. Removing the shaft is a key step because high-performance blenders and immersion blenders rely on secure parts to prevent leaks and ensure safe cleaning, especially when handling tougher, hotter components.
Abruptly identifying this safety sequence helps prevent damage to the motor base and blades, which makes the cleaning process quicker and more efficient in the long run.
How to Rinse Your Immersion Blender Without Touching the Blades
Now that the shaft’s detached, hold it under warm running water and let the flow do the heavy lifting — no scrubbing, no touching the blades. We’ve found that keeping fingers away from the blades isn’t just safer, it actually stops you from pushing food into those tight crevices that are a nightmare to clean later. Rinse until you can visually confirm there’s no residue left, and, well, that’s really all there’s to it.
Safe Rinsing Technique
Once the blending shaft’s detached, rinsing it properly is probably the easiest part of this whole process — but it’s also where most people accidentally nick a finger. Keep fingers well away from the blade. Always.
We recommend holding the shaft at the top, letting warm running water do the heavy lifting. Water exposure should stay focused on the shaft only — never let it reach the motor housing.
| Safety Consideration | What To Do |
|---|---|
| Blade contact | Keep fingers away always |
| Motor water exposure | Direct water away completely |
| Stuck residue | Re-rinse immediately, don’t wait |
| Drying food particles | Rinse promptly before residue hardens |
In my experience, a second rinse beats scrubbing dried food later. It’s just not worth the hassle.
Avoiding Blade Contact
Rinsing the shaft correctly is one thing — keeping your fingers away from the blades while doing it’s another thing entirely. Blade safety isn’t complicated, but it does require some deliberate habits. Point the blades away from your hands during every rinse. Always. It’s such a simple rule, yet easy to forget when you’re moving quickly.
Contact avoidance also means resisting the urge to scrub stuck food off with your fingers. We get it — it’s tempting. Instead, grab a soft brush after rinsing. Think of those blades like a sharp kitchen knife; you wouldn’t drag your fingers across one carelessly. If food still clings stubbornly, the brush handles it safely. Your hands should never, ever touch the blade area directly.
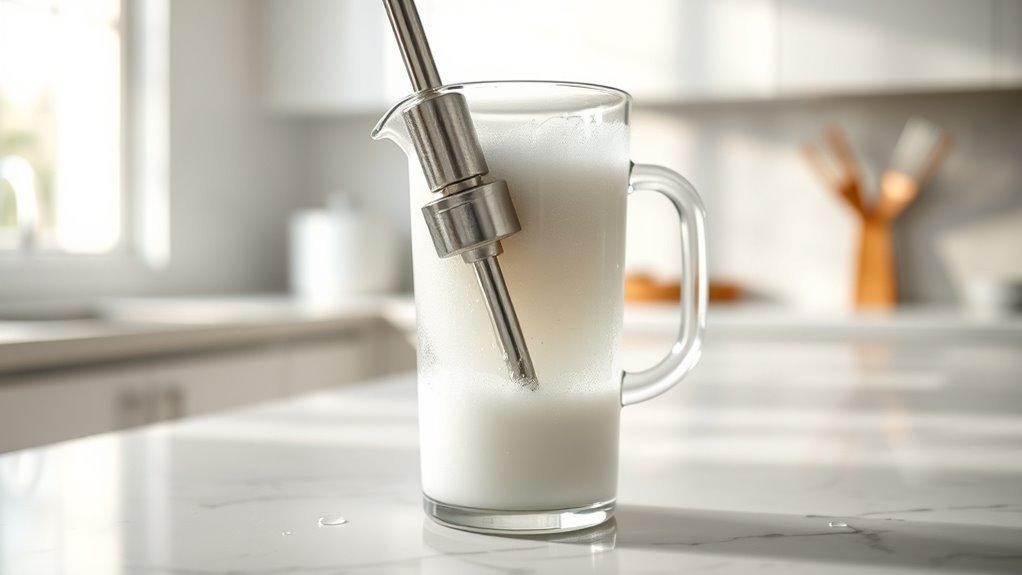
Blend Soapy Water to Lift Stuck-On Food
soap, blend. That’s genuinely it.
We fill a jar or bowl with warm water, add a few drops of dish soap, reattach the blending shaft, and run the blender on its lowest speed for about 30 seconds.
Washing blades this way lets the soapy water circulate through every internal pathway without us scrubbing anything manually.
Keep the blender fully submerged while it runs — think of it like a tiny whirlpool washing itself clean.
If stubborn food remains afterward, we run another 20–30 second cycle.
Then we unplug, detach the shaft, and rinse everything thoroughly to clear out any leftover suds.
When to Use a Scrub Brush on Your Immersion Blender

Sometimes, rinsing and a quick soapy wash just won’t cut it — and that’s when we reach for a scrub brush. We’d normally avoid using a sponge near the blades, since it reduces our grip and, honestly, the cutting risk isn’t worth it. A scrub brush gives us the firm, controlled pressure we need to work through crevices and stubborn residue on the detached shaft safely.
Avoiding Sponge Risks
Why reach for a sponge when it’s actually one of the riskier moves you can make around sharp blender blades? Sponges reduce your grip and dexterity, and honestly, that’s a problem when you’re handling detachable blades that can cut you before you even realize what happened. Sponge risks are real — it’s kind of like trying to thread a needle while wearing mittens. Not ideal.
Blade safety should always come first, so we recommend skipping the sponge entirely. Instead, a scrub brush keeps your fingers at a safer distance while still giving you the scrubbing power you need. It’s a small swap that makes a big difference. Don’t underestimate how quickly things can go wrong with the wrong tool.
When Scrubbing Is Necessary
Most of the time, a quick rinse and some soapy water will do the job — but every once in a while, you’ll run into stubborn residue that just won’t budge. That’s when a scrub brush becomes your best friend.
We treat scrubbing as a last resort, not a first move. Once the shaft is detached, use a scrub brush with warm, soapy water and apply firm, controlled pressure right where the residue sits. Don’t scrub the blades with a sponge — stick to the brush on the shaft only.
After scrubbing, rinse everything thoroughly. Actually, this part’s important: make sure all parts are completely dry before reassembly. Even a little leftover moisture, or soap, can cause problems down the line.
Safe Scrub Brush Technique
Few things are more frustrating than finishing a wash cycle only to find sticky residue still clinging to the blending shaft. That’s where a scrub brush becomes our best friend—but only as a last resort.
Follow this safe technique to avoid safety risks:
- Detach the blending shaft from the base before scrubbing—never scrub blades while attached.
- Soak in warm, soapy water first to loosen stubborn particles and reduce required scrub pressure.
- Use the brush to scrub the detached shaft, keeping hands away from sharp edges throughout.
After brushing, rinse everything thoroughly under running water. I think the detaching step is probably the most critical—it’s what transforms a risky chore into a manageable, actually pretty safe task.
Cleaning Mistakes That Make the Job Harder
There are a handful of mistakes that can turn a 60-second cleanup into a frustrating, drawn-out ordeal. One of the biggest? Letting food sit too long. Once it dries and hardens, you’re fighting a losing battle. We’ve all been there.
A few safety reminders worth repeating: always unplug before disassembly — skipping this is how accidental starts happen. And don’t touch the blades directly during rinsing; use controlled movements and keep your fingers clear.
Cleaning shortcuts can backfire too. Using a sponge on the blades, well, that’s probably the fastest way to dull your reflexes and risk a cut. Stick to a scrub brush on the shaft only. Also, never run the blender mid-clean with parts loose — it scatters food everywhere. More mess, not less.
How to Prevent Residue From Hardening After Each Use
Knowing what not to do is only half the battle — the other half is building habits that stop residue from becoming a problem in the first place. Think of it like doing dishes: the longer you wait, the harder everything gets.
Here’s what we recommend doing immediately after every use:
- Unplug the blender first, then detach the shaft — this matters for food safety and, actually, most warranty tips mention it too.
- Rinse the blades under warm running water right away, without touching them directly.
- Separate every piece so residue doesn’t hide in crevices and harden overnight.
That quick rinse probably takes ten seconds. It’s nothing, but it genuinely eliminates most of the scrubbing later.
Frequently Asked Questions
How to Easily Clean an Immersion Blender?
We’ll share our favorite cleaning shortcuts: detach the shaft, rinse it, then blend soapy water for 30 seconds. This rapid maintenance routine keeps your immersion blender spotless without hassle!
How to Clean a Blender Quickly?
By Jove, we’ve got you covered! For quick cleanup and blender maintenance, we’ll fill it with warm soapy water, run it briefly, rinse thoroughly, and dry—it’s done in under 60 seconds!
How to Change Speed on Kitchen Aid Immersion Blender?
We’ll change speed on our KitchenAid immersion blender using the handle’s dial or switch. In our two word discussion: start low, gradually increasing speed while keeping the blending shaft fully immersed to prevent splattering.
How Do I Unclog a Blender?
Like a drain after a storm, clogs happen fast! For unclogging techniques and blender maintenance, we’ll reattach the shaft, blend warm soapy water on low for 30 seconds—it’ll dislodge stubborn particles effortlessly.